Tuesday, August 24, 2010

Reuseable Plastic Storage Bags

After seeing several version of making these environmentally friendly bags, I chose this tutorial:


Other ways of making them used oilcloth for a lining and a cloth fabric for the outside. Those are great options for making sandwich/snack bags as they're food safe. But, personally, I like seeing what's inside.


I chose the filmy vinyl plastic because it was way easier to sew. It didn't actually stick at all on the foot, which is a HUGE bonus when working with plastic.

I bought the fabric at Hancock Fabrics and it was only about $1.29 for a whole yard! I got half a yard and still have enough to make probably...10 more of the size I made? I made mine a little on the bigger side with finished measurements of 8 1/2"x7 1/2".

NOTE!!! I've since learned that this particular fabric I used isn't food safe. It contains PVC which has bad stuff for your food to be in contact with. This is why it's now a storage bag only.

Monday, August 23, 2010

BIG Boxy Bags!

This one I made for my sewing supplies for school. There's a lot of stuff I need to have with me and I think this will be perfect! Plus, look at the amazing scissor lining!!


Mom made this one with me. Mother Daughter sewing project! It turned out great, love the fabrics!

Tuesday, August 17, 2010

ON A ROLL!!

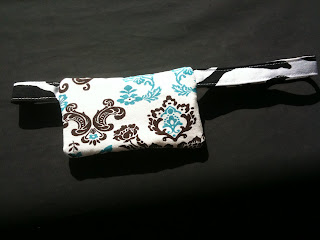
I had the whole day to myself so I'm getting a lot of sewing done! This iphone/ipod wristlet was another project by Pretty Modern!

Mine seemed to turn out a little small, but it's the PERFECT size for my iphone with it's slightly bulky cover. Nothing else is fitting in there other than maybe some cash and a card though! It would make a cute little wallet without the phone too.


Looooove it! The only mod I made was doing a zig-zag around the inside so that the lining wouldn't be totally raw. No fraying and it looks pretty good!

Key Fob Wristlets

After seeing these on Etsy I had to have one!! I found a bunch of tutorials online of slightly varying techniques and after compiling them all this is how I made mine. I couldn't find any key fob hardware at Micheal's, Joann's, or Home Depot, and I didn't want to buy any online since I'm leaving for school again soon, so I found someone who made them using D-rings instead. Genius!

So these are how they turned out. I only had 2 D-rings on hand otherwise I'd have made more! Such a great little project.


Want to make your own? These are the directions I followed:

Buttercuppity's long-awaited-ummm-yeah-sorry-key-fob Tutorial

The mods I made were at the end. Like I said, instead of the key fob hardware I used a D-ring.

1) Slip on the D-ring to the middle of the strip

2) With right sides together, sew the two raw ends together.

3) Trim the seam and flip so that the seam is now inside.

4) Now slip the D-ring over the seam.

5) To finish the raw edge and secure the D-ring sew a french seam which will encase them both.


Hopefully that's not too confusing without pictures! If you need any help or clarification just let me know.

Monday, August 16, 2010

Properly Packaged in a Pleasing Manner


Hannah's legwarmers are ready to be shipped cross-country! I hope they enjoy their new home and bring much happiness to their Halloween!

Saturday, August 14, 2010

Hey, Barbie, how do you keep in such great shape??

"My legwarmers, of course!!!!!! GOSH!"


Thus they're done and going to Hannah this week. From the East coast to the West coast! Have fun, Barbie!

Tuesday, August 10, 2010

Japanese Box Bag!

I was recently surfing Etsy when I came across these types of bags called Japanese Box Bags. After looking around to see others that people have made I thought I might buy one. But, upon further consideration, I wanted one like right now. So I looked online and found a couple tutorials on how to make them! I used this one, which was great because it makes a fully lined bag, which a lot of others didn't:

It's a Pretty Modern Life

I also ended up buying that blue nail polish!! <3

Anyway, here's how it turned out:


I used fabric I had left over from making a jacket for my Mom and some muslin for the lining. Since one of the only zippers I had on hand that was long enough was red, I found some other old red fabric to use as the little pull tabs on either end to match.

I think it turned out super cute and I will be making one for myself soon! Already obtained super cute fabric and I'm going to make it even bigger than the tutorial directs! Hopefully it'll be big enough to carry my sewing supplies!

Great Shape Barbie!


So I only have one done as of right now, but the second will only take a couple days now that I've figured out how to make the first. Here's a little preview!


Those pictures were taken before I wove in all the ends and closed the little color change holes. Can't wait til their done so Hannah can wear them with her costume!